In which I sew a pillowcase
I just sewed my first real serious item of stuff. Last week, after rapidly becoming acquainted with my shiny new Brother XL2230, I stitched up a Halloween costume. Buuut... that was basically just a bag that didn't need to last longer than one evening. This evening I made a chocolate brown pillowcase. Awesome.
After peering around for free patterns (which there isn't much of on the net incidentally) I pieced together some instructions by perusing pages at thriftyfun and craftfabriclinks, and adapting it out myself. In retrospect it's pretty piss easy. I did the following:
- Measured my priorly existing pillowcases as a guide - I found the width was 18" and the length was 28"
- I added an inch onto the width for seam allowance, and 4" + 1" = 5" for a hem on the length (in retrospect I'd add a couple more inches for a slightly larger hem) to give a total size of 33" by 18"
- I doubled the width coz, yanno, pillows have a front and back...
- ...to give a total fabric size of 33"x38"
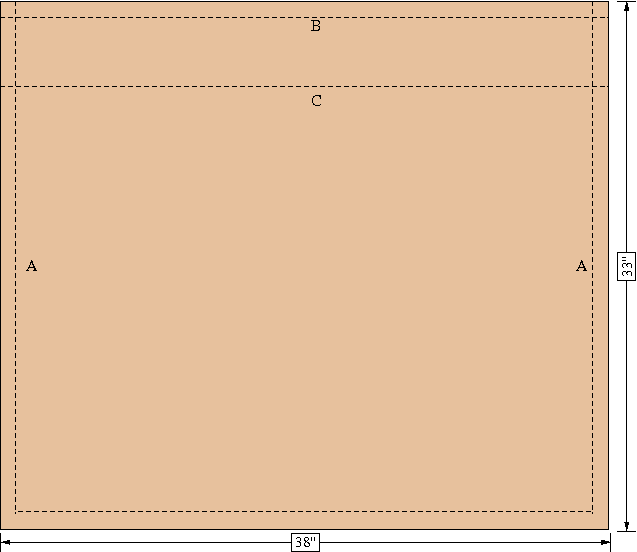
- I folded it in half (so that the two A's meet) and stitched it together along the seam marked A - all the way along the bottom and up one side. I used a zigzag stitch.
- Then I heated up my iron and ironed down along the line marked B (so that it is folded down on what is currently the outside, but will be the inside of the pillow - commonly known as the WRONG side in patterns) and stitched it down with a straight seam.
- I then folded down another four inches along the line marked C, again over the WRONG side, so that there will be four inches of hem on the inside of the pillow. I sewed it down with a straight stitch about a quarter inch lower than the last seam.
- I turned it inside out and TADA! It actually worked!

I also came across the following, rather pretty cool looking sewing pattern site: savvyseams. It's in the trendy young project runway inspired vein, rather than the old grizzly grandma one.
![]()

No comments:
Post a Comment